
Technical clothing sells on details shoppers cannot see in a photo: a membrane rated to 10,000 mm, seams that are taped, a pocket that holds a phone without bouncing, a knit that weighs 110 g/m². A bullet list in the description hides them. Product anatomy puts them on the garment itself.
It shows a product photo with numbered points. Each point leads to a short card: a number with its unit (which counts up as the section comes into view), a title, and a sentence about what the feature does for the wearer. On phones the cards stack under the photo, with the numbers in the same order; on computers they sit beside the photo with a line to their point.
The Performance specs block then repeats the key numbers as chips beside the price, so a shopper scanning the top of the page sees "10,000 mm", "210 g", "4-way stretch" before scrolling.
It was built for the Flatlock style (running and training wear), and works for any product with features worth explaining: outerwear, denim construction, bags, footwear and tailoring.
How the features are stored
Each product carries its own features in one metafield, so a single product template serves your whole catalog: the anatomy of a rain jacket on the jacket, the anatomy of a legging on the legging.
Go to SettingsCustom dataProducts and select Add definition.
Name it Product anatomy. Set the namespace and key to
custom.anatomy.Choose the type Multi-line text (one value) and save. Make sure storefront access is on.
Open a product. In Metafields, fill Product anatomy, one feature per line.
Each line has seven parts separated by a vertical bar |:
Title | Text | Number | Unit | Across | Down | left or right| Part | What to write | Example |
|---|---|---|
| Title | The feature's name, two or three words | Taped seams |
| Text | What it does for the wearer, one sentence | Every seam sealed, so no water finds a way in. |
| Number | Optional. A figure worth noticing | 10,000 |
| Unit | Optional. Its unit | mm |
| Across | Where the point sits on the photo, in percent from the left | 40 |
| Down | In percent from the top | 40 |
| left or right | Which side its card sits on, on large screens | left |
A full example for a rain jacket:
Stretch hood | Moves with your head, stays put in the wind. | | | 50 | 13 | left
Waterproof shell | A 2.5-layer membrane that keeps the rain out. | 10,000 | mm | 40 | 40 | left
Taped seams | Every seam sealed, so no water finds a way in. | | | 36 | 70 | left
Vented back | A yoke vent lets heat out while you run. | | | 62 | 30 | right
Packable | Folds into its own chest pocket. | 210 | g | 60 | 52 | right
Reflective | Details that catch headlights after dark. | 360 | ° | 63 | 71 | right
Up to six features show. Leave a part empty but keep its bar, as in the hood line above.
Numbers
Whole numbers count up from zero when the section scrolls into view: 10,000 runs up to 10,000. Numbers with decimals or letters, such as 2.5 or IPX4, appear as written. Commas in thousands are fine. Shoppers who prefer reduced motion see the final number straight away.
Placing the points
The points sit on the product's first photo (its featured image), so use a clear photo of the whole garment on a plain background.
Open the photo and imagine a grid: 0 is the left edge and 100 the right; 0 is the top and 100 the bottom.
Estimate each feature's position, for example the chest pocket at 60 across and 35 down.
Save the product and look at the page. Nudge the numbers by 2 or 3 until each point sits exactly on its detail.
Put cards on the side of the photo nearest to their point: features on the left half get
left, the restright, so lines stay short.
Add it to the product page
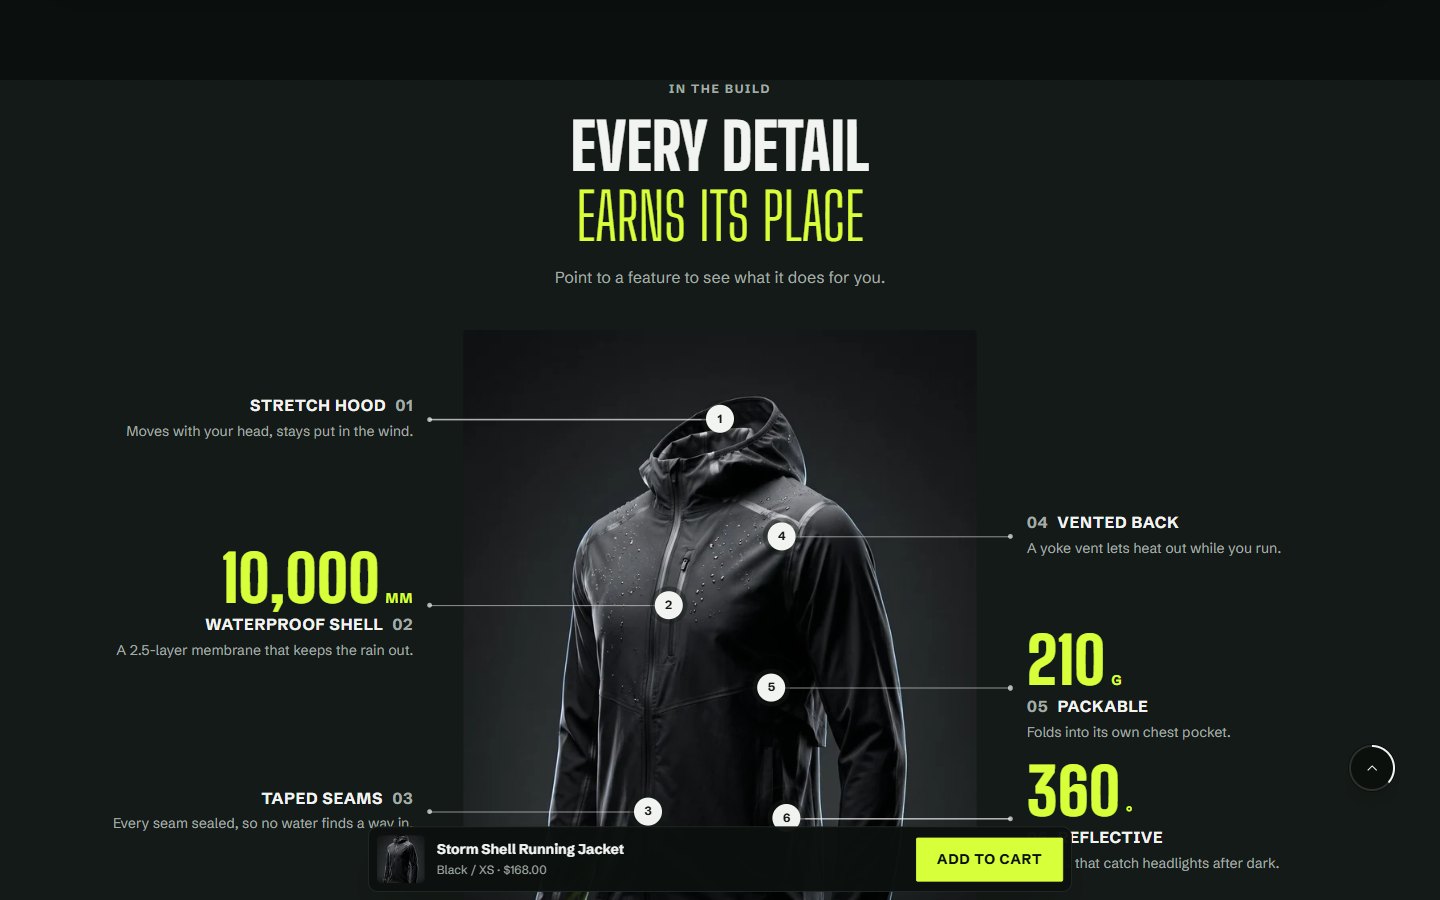
In the theme editor, open a product with features and select Add section under Product information.
Choose Product anatomy.
Write a Subheading and Heading for the section, for example "In the build" and "Every detail earns its place", and an optional Text.
Leave Product empty: on a product page the section shows that page's product.
Leave Button label empty on product pages; the shopper is already there.
Choose a Color scheme. A dark scheme makes the lines and points stand out.
Save.
On products without a custom.anatomy value, the section uses its own Feature blocks instead. Gift cards never show it.
Add it to the home page
The section works anywhere. On the home page, choose a Product (its title, price and link appear below), an Image if you want a different photo, and a Button label such as "Shop the jacket". If the product has a custom.anatomy value, its features are used; otherwise add Feature blocks in the editor, each with the same parts as a metafield line.
Spec chips beside the price
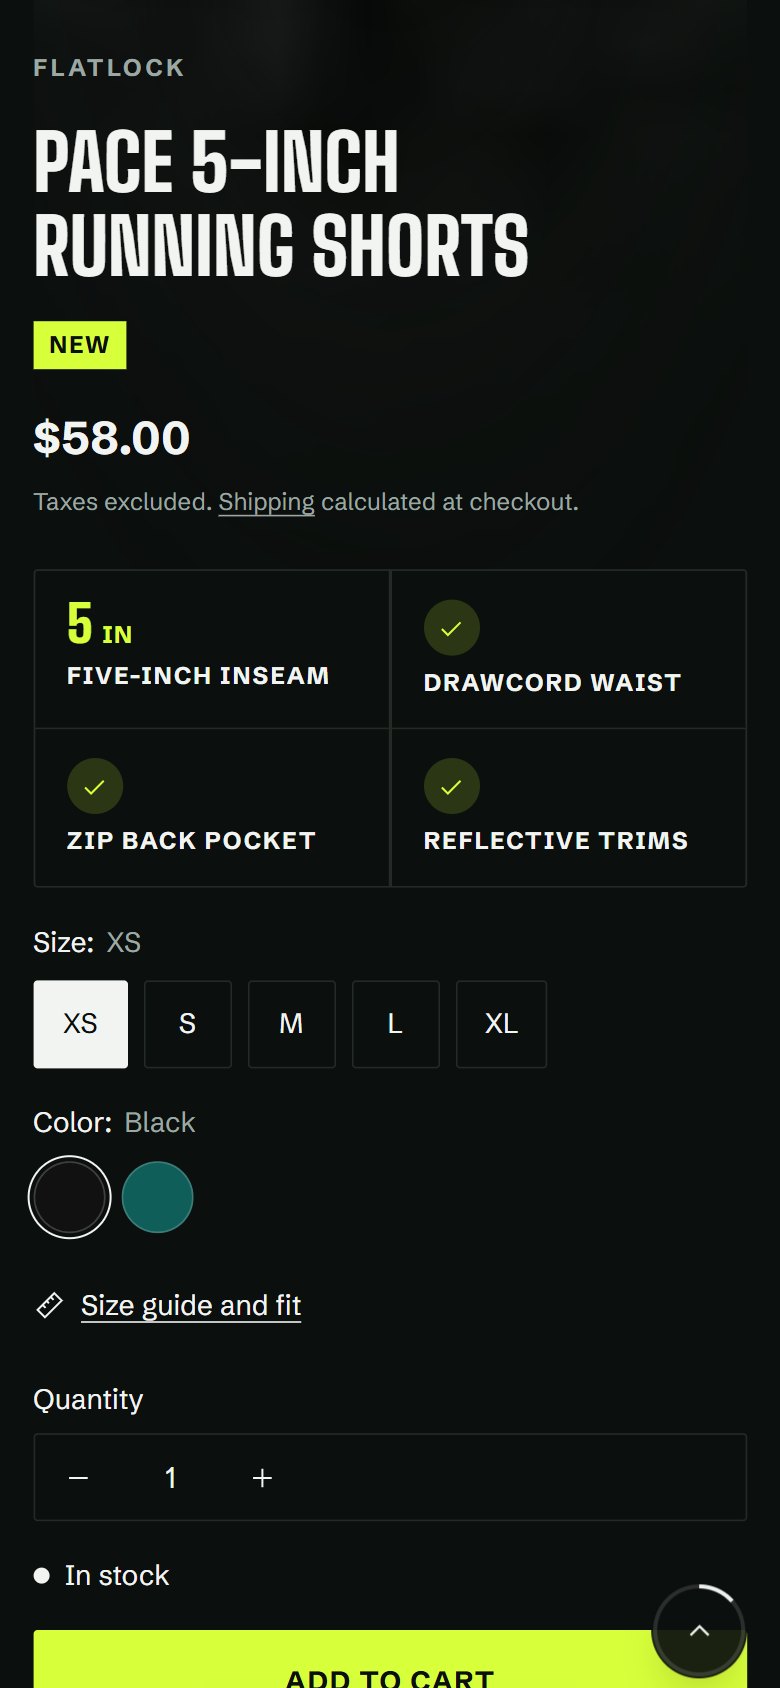
Add the Performance specs block to Product information, right under the price.
- It reads the same
custom.anatomymetafield. - Features with a number come first, shown as a large figure with its unit and the title below: "10,000 mm, Waterproof shell".
- Features without a number follow, with a check mark.
- Features to show sets how many: 2 to 6, 4 to start.
Nothing shows for a product without the metafield, so the block can stay in a template shared by all products.
Ready-made lines for common garments
Copy these into your own products and adjust the numbers and positions to your photos. The positions assume a front view centered in the photo.
Running tee
Laser-cut vents | Let heat out across the upper back. | | | 50 | 34 | right
Featherweight knit | A recycled sweat-wicking knit that dries in minutes. | 110 | g/m² | 40 | 58 | left
Raglan sleeves | Seams that never sit under a pack strap. | | | 28 | 26 | left
Flatlock seams | Lie flat against the skin, so nothing rubs. | | | 72 | 70 | right
Running shorts
Drawcord waist | Stays put at every pace. | | | 50 | 14 | left
Zip back pocket | Holds a phone without bounce. | | | 52 | 34 | right
Five-inch inseam | Room to stride, nothing to flap. | 5 | in | 30 | 70 | left
Reflective trims | Catch headlights after dark. | | | 76 | 84 | right
Leggings
High rise | A wide waistband that stays put through every rep. | | | 50 | 20 | left
Hidden pocket | Room for a key inside the waistband. | | | 62 | 26 | right
Compressive knit | Holds you in, squat after squat. | 4 | way | 44 | 60 | left
Gusset | Freedom to move in every direction. | | | 58 | 78 | right
Raw denim jeans
Selvedge outseam | The clean finished edge of shuttle-loom denim. | | | 30 | 62 | left
Heavyweight denim | Breaks in to your shape over months of wear. | 14.5 | oz | 46 | 45 | left
Chain-stitched hem | Rolls into the classic rope pattern as it fades. | | | 40 | 93 | left
Copper rivets | Reinforce the pockets where they take the strain. | | | 64 | 30 | right
The 14.5 in the jeans example has a decimal, so it shows as written rather than counting up.
Write features that sell
- Lead with the benefit. "Dries in minutes" beats "Polyester blend". Put the material in the sentence, the benefit in the title.
- One idea per point. Six clear points beat ten crowded ones.
- Use numbers you can prove. A waterproof rating, a weight, a fabric weight in g/m². If you would not put it on the label, leave it out.
- Match the photo. A point on a detail the photo does not show confuses more than it helps.
- Keep sentences short. Cards sit on phones, beside a photo. Ten to twelve words is plenty.
Fill a whole catalog
For many products, fill the metafield in bulk:
- Export your products to CSV from Products, or use the bulk editor and add the Product anatomy column.
- Write each product's lines. In a CSV cell, keep the line breaks inside quotes.
- Import, then check a few product pages and nudge any points that sit off their detail.
Questions merchants ask
The points are not on the right place
They are placed on the product's first photo. If you changed the photo order, the points now sit on a different image. Put the full-garment photo first, or adjust Across and Down.
A number does not count up
Only whole numbers count. 2.5, 4-way or IPX4 are shown as written.
Can I use it for products without numbers?
Yes. Leave Number and Unit empty; the card shows the title and text only, and the chip shows a check mark.
How many features can I add?
Up to six on the photo and in the chips. Extra lines are ignored.
Was this guide helpful?
Still need help?Write to us with your shop's address and a screenshot. We reply within two business days, Monday to Friday, usually sooner.
Contact support