
A drop is a promise with a date: this collection, this many pieces, this moment. Done well, it turns a launch into an event that shoppers wait for, sign up for and come back for. Done badly, with a countdown that resets itself or a date that slips, it teaches them not to believe you.
Selvedge's drop tools are built on one rule: the countdown always counts to a real date that you set, and it never restarts or invents urgency. When the date arrives, the page changes on its own. This guide takes you from the first teaser to the day after.
The two ways to run a drop
| Way | Shop is | Best for |
|---|---|---|
| Drop launch section | Open as usual, with the drop on the home page (or any page) | A new collection or a capsule while the rest of the shop sells |
| Password page as a drop page | Closed with a password until the launch | A brand launch, or a store that only sells in drops |
You can combine them: a closed store before your first launch, then the Drop launch section for every drop after.
Step 1: plan the date
Pick the release date and time before anything else, and keep it. Write it down with your time zone.
Then decide:
- What is in the drop: the products, and how many of each size.
- Where they will live: a collection, for example
drop-autumn, so one button can lead to all of them. - How you will tell people: your sign-up list, social posts, and the email that goes out at the release time.
Prepare the products now, as Draft or unpublished from your online store, with photos, descriptions, sizes and fit details complete. On the day, you only publish them.
Step 2: the Drop launch section
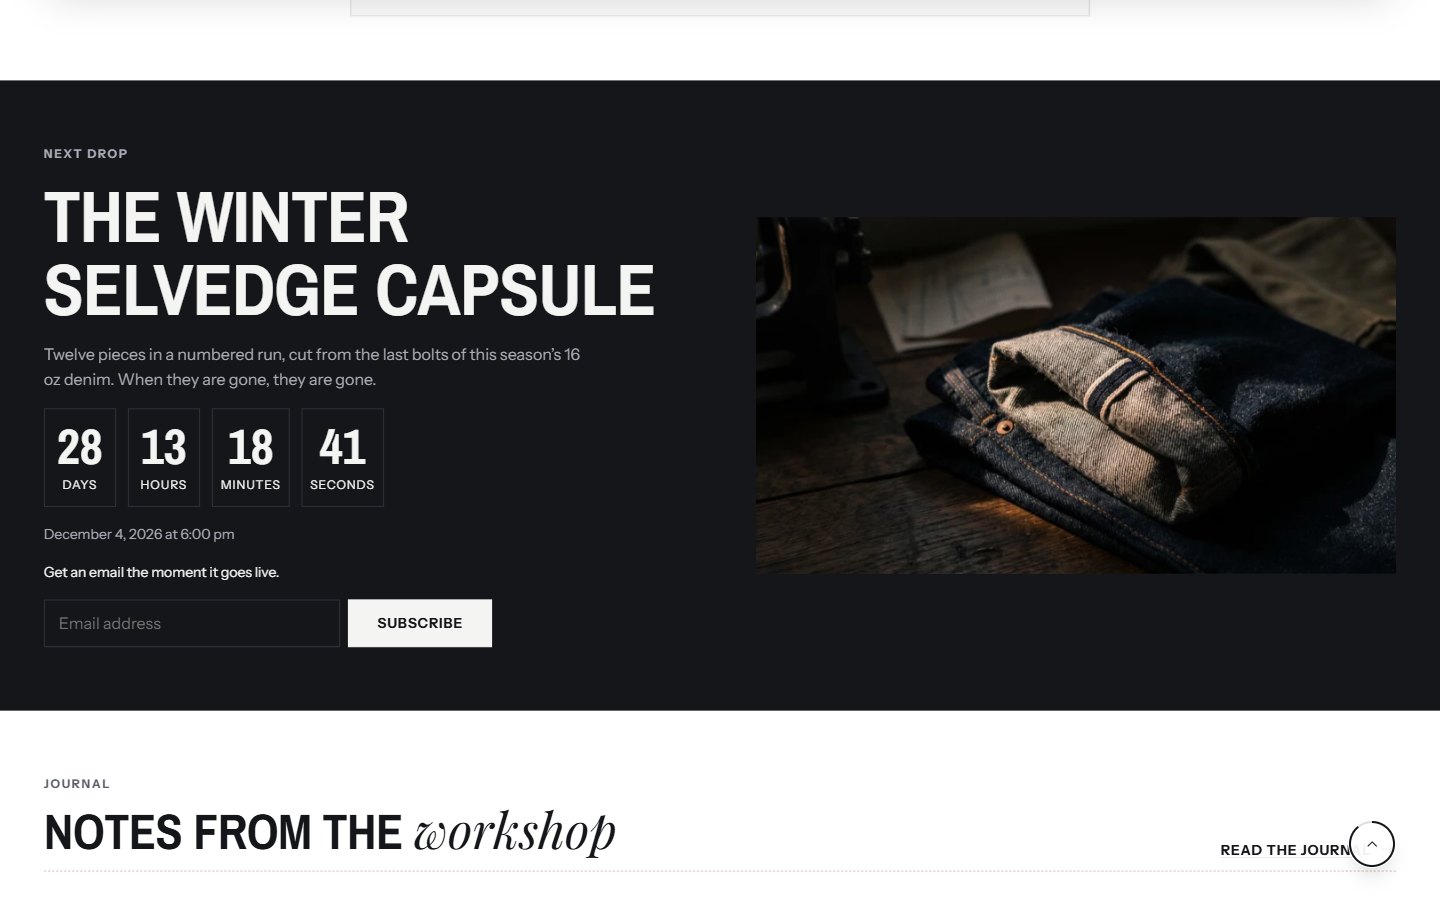
In the theme editor, open your home page and select Add section > Drop launch. Place it near the top: under the hero is ideal.
Add an Image: a teaser photo, a detail, or a silhouette. Choose the Image position (left or right on large screens).
Write a Subheading, a Heading and a short Text: what is coming and why it is worth waiting for.
Set the Release date as year-month-day, for example
2026-12-04, and the Release time in 24-hour time, for example18:00.Keep Show the sign-up form on, write the Sign-up text ("Get the link before everyone else"), and set a Customer tag, for example
drop-autumn.Set the Button label and Button link that appear once the drop is live, for example "Shop the drop" leading to the drop collection.
Select Save.
Before the release, shoppers see the countdown in days, hours, minutes and seconds, the release date written out in their language, and the sign-up form. At the release time the countdown removes itself and the section shows your button. Nobody needs to touch anything.
Preview the live state
You will want to see the "live" version before the day. Turn on Preview the live state in the editor: the editor shows the section as it will look after the release, with the button. Customers keep seeing the countdown. Turn it off again when you are done.
Step 3: early-access sign-ups
Everyone who signs up in the section becomes a customer who accepts marketing, with two tags: newsletter and your drop tag. That tag is what makes the next step work.
Grow the list before the date:
- Share the page in your social posts and stories: "Sign up for the link".
- Use the newsletter popup with the same promise.
- Mention the date in the announcement bar.
Step 4: send the "it's live" email
In Shopify Email, create a campaign for the release. Write it ahead: subject, photo, the button to the drop collection.
As recipients, choose a segment: customers with the tag
drop-autumnwho accept marketing.Schedule it for the release time, or send it the moment you publish the products.
Early access works best when it is real. Some brands send the email ten minutes before the public release, and publish the products at that moment; the countdown then marks the public opening.
Step 5: the day
A few minutes before the release, publish the drop products to your online store and add them to the drop collection.
At the release time, the Drop launch section switches to the button by itself.
Your email goes out (scheduled, or send it now).
Watch stock. When a size sells out, Selvedge shows it crossed out on cards and offers the back-in-stock form on the product page, so demand is captured rather than lost.
A whole store as a drop page
Before your first launch, or for brands that only sell in drops, close the store with a password (Online StorePreferences > Password protection). Visitors then see the Drop page: the password page of Selvedge.
In the theme editor, choose Password in the page selector and set:
| Setting | What it does |
|---|---|
| Background image | A full-screen teaser |
| Heading | The name of the launch |
| Launch date, Launch time | The countdown, in your store's time zone |
| Show newsletter signup, Newsletter text | Collect sign-ups while the store is closed |
At the launch, remove the password in Preferences and the store opens.
A drop timeline
The best drops are planned backwards from the release moment. A four-week plan that fits a small team:
| When | What to do |
|---|---|
| Four weeks out | Fix the date and time. Choose the products and quantities per size. Book the photography. |
| Three weeks out | Create the products as drafts, with photos, fit details and anatomy. Create the drop collection. Write the teaser copy. |
| Two weeks out | Add the Drop launch section with the countdown and sign-up. Mention the date in the announcement bar. Start the teasers on social media, always pointing to the sign-up. |
| One week out | Write and schedule the "it's live" email to the drop tag. Preview the live state in the editor and check every link. |
| The day before | Check stock, shipping rates and discounts. Place a test order with Shopify's test payments on a draft product. Tell your team the exact minute. |
| Release | Publish the products, watch the email go, answer questions quickly, and keep an eye on sizes that sell out. |
| The day after | Thank the list, share what sold, collect back-in-stock requests, and decide on restocks. |
Write the teaser
A teaser has one job: to make people sign up. Three short lines do it:
- What: "The autumn denim drop."
- When: "Thursday 4 December, 6 pm."
- Why sign up: "Early access 10 minutes before everyone else."
Put those three lines in the section's subheading, heading and sign-up text, and in every social post.
Stock and sizes
Drops sell out by size, not by product. Before the day, look at your size curve from past orders and make more of the sizes that sell first. On the day, sold-out sizes are crossed out on product cards and the back-in-stock form collects interest, which tells you exactly what to restock.
After the drop
- Thank the list. Send a short email to the drop tag with what sold, and what comes next.
- Move the section. Point the Drop launch section at your next date, or hide it until you have one. A countdown to a date in the past is never shown: after the release the section shows its button.
- Keep the tag. Shoppers who signed up for one drop are your best audience for the next. In your next campaign, include everyone with any
drop-tag. - Restock thoughtfully. Back-in-stock requests tell you which sizes and colors to make more of.
Questions merchants ask
The countdown shows the wrong time
The release time is read in your store's time zone, from SettingsGeneral. A shopper in another country sees the same moment counted down in their own clock.
Can the countdown restart for each visitor?
No, by design. Timers that restart for each visitor are misleading, and in the EU and UK they can break consumer protection rules. Selvedge counts only to the date you set.
Can I run two drops at once?
Yes: add two Drop launch sections, each with its own date, tag and button.
Where do I find the people who signed up?
In Customers, filter by the tag you set. They are subscribed to email marketing, so Shopify Email can reach them.
Was this guide helpful?
Still need help?Write to us with your shop's address and a screenshot. We reply within two business days, Monday to Friday, usually sooner.
Contact support